Monday, October 5, 2009

End Table Redo

I'm linking this to Shabby Nest's Frugal Friday!
I found this little guy at my new favorite thrift store...

Photobucket
Photobucket

I'm not liking the color, but I'm loooooving the lines

So I sanded him down

Photobucket

Sprayed him with a coat of white spraypaint, just for a base

Photobucket

And then painted him with interior paint in white. (Not pictured)

Then I took these stencils and using a silver/grey (grey,gray?) paint, I made him pretty

Photobucket
Photobucket

I bought a new bauble knob from Lowes and stuck that on there.

Photobucket

And now I cannot get enough of my table!!! I love love love it!! SQUEEE!

Photobucket
Photobucket

Fabric on Canvas

Just a quick and easy idea for old scraps laying around... I took an old canvas I had painted on back in college, some fabric I wasn't going to use for anything and my staple gun and just "reapholstered" if you will, the canvas.

Photobucket
Photobucket
Photobucket

Easy! Make sure you pull and staple really tight so you don't have any wrinkles in the fabric. How cute would these look in some sort of toile print!?!?

Tuesday, September 29, 2009

Sorry I've been MIA

So sorry I have been MIA for a while. I have had alot going on, but I do have some new projects coming up soon!

Monday, September 21, 2009

Check out ThrivingWhileSurviving!!!

Check out my cousin Lindsay's blog thrivingwhilesurviving.blogspot.com

She just started, but already has an AWESOME post about tips on how to remove nailpolish from clothing!

Run over, say hi, welcome her to the world o' blogging... and tell her Amy sent ya!

Fall/Halloween Decor

RHONDI at ROSE COLORED GLASSES
is having an AUTUMN PARTY

Just wanted to share my fall/halloween decor in my dining room, I know it's early for Halloween, so I tried to keep it more along the "fall" lines...but YOU KNOW it's soooo hard for a crafty girl to not be able to decorate according to the next holiday especially one as fun as Halloween!! I would also like to add that I got everything for the cheap, either at thrift stores or the Dollar Tree. The most expensive thing was the tablecloth that I bought for $5 at my favorite thrift store.

The Bar...

Photobucket
Photobucket

Side Table

Photobucket

Dining Table

Photobucket
Photobucket
Photobucket
Photobucket
Photobucket
Photobucket
(I love love love really old vintage books and I bought these today for only $1 each!!)
Photobucket

EEEEK! I can't wait to put more stuff up! My husband has laid down the law and said I'm not allowed to put up anything really "halloween" untill October *sits in corner and pouts* But I think this will do for now.

Easy Halloween Decorations

I was browsing the Dollar Tree today and found these frames...

Photobucket

The white one ended up breaking, but oh well...the rest of them I spray painted black and then framed cute scrapbook paper...

Photobucket

Voila! I'm sooo into the shiny black frames and bright cheery paper! I love love love them!

Friday, September 18, 2009

Turn an Old Book Into Something Pretty!

Okay really, I think this has been the easiest thing I've ever done, and I feel like I have a fuzzy memory of making these when I was a little girl.

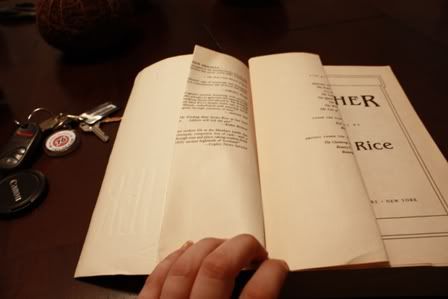
I bought this book at the Goodwill for $1 specifically for this project. I have never read Anne Rice, so I don't know if this book is any good, but if anyone out there is reading my blog, and this is your favorite book ever...look away, it's gonna be a bloodbath..... Okay not really, but I will be destroying this book.


Photobucket

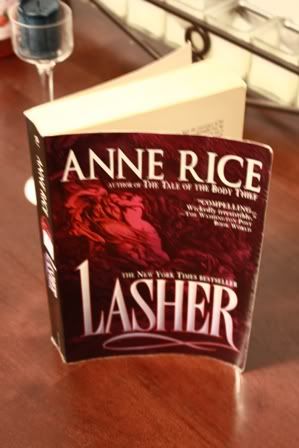
I bought this book because:

A) it wasn't hardcover

B) the pages were huge

C) It had alot of pages, I think it was over 550 pages.

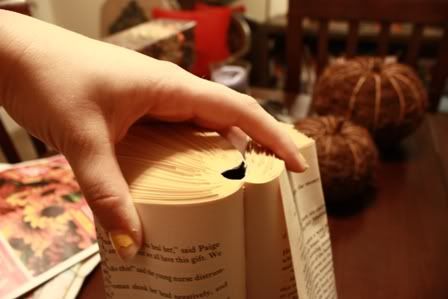
All I did was I started with the first page, and folded it in half.

Photobucket

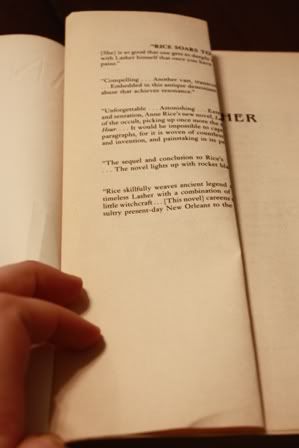
and then turned the page

Photobucket

Keep going

Photobucket

Keep going

Photobucket

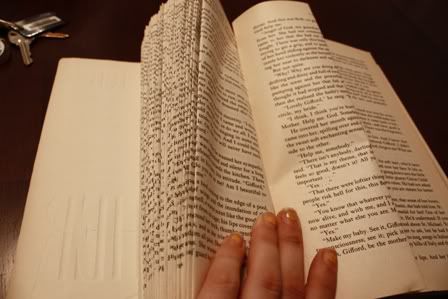
Until all of your pages are folded

Photobucket
Photobucket

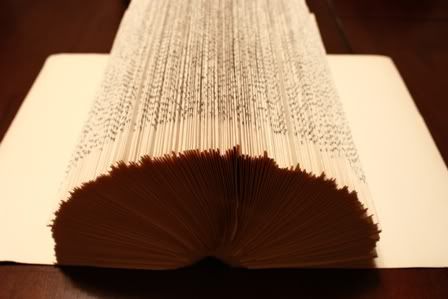
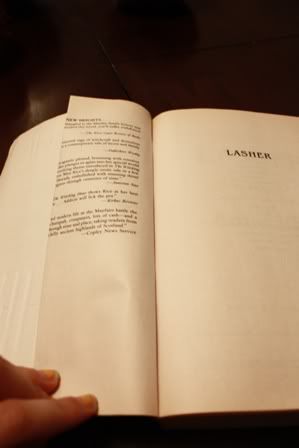
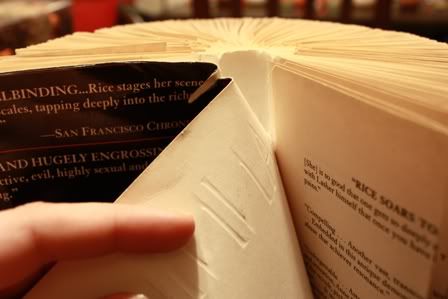
Now open up the book in random spots to kind of loosen the spine from the cover

Photobucket

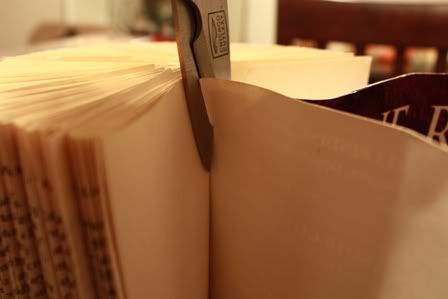
Carefully remove the cover of the book without ripping the spine (you'll know if you ripped the spine if the pages all fall out one by one.) Use scissors if you need help.

Photobucket
Photobucket

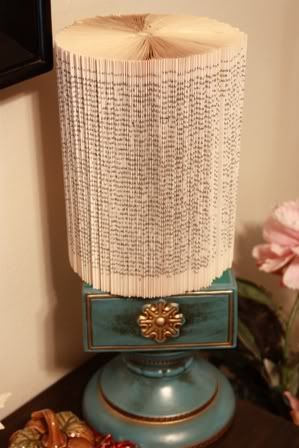
Once the cover is off, the folded pages should push against eachother to spin out like this

Photobucket

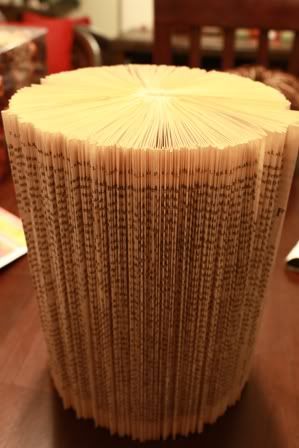
If it doesn't, you may need to re open more pages to kind of loosen the spine a little bit more, and if that still doesn't work, use some craft glue to hold the spine together.

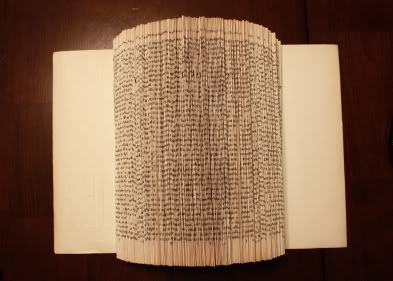
I stuck it on a pedestal (that I may or may not be painting a different color) that I bought from Goodwill for $3. It really serves no purpose. I just thought it looked cool on my bookshelf.

Photobucket

More Thrifty Finds

Everyone needs to run...not walk...to their local Target! I found these in the dollar spot there for $2.50 each!

Photobucket

Then get in your car and FLOOR IT to big lots. All of their Jennifer Ferrell stuff (which is pretty nice designer stuff) is all on sale for 70% off!! They had like furniture there that was normally $200 and is now $60! Crazy! I didn't get anything huge, but I did walk away whith this uber cute bowl and filler/smell good stuff!

Photobucket

I got each of these for $6

I just threw one of the packages in the decorative bowl

Photobucket

I love deals!

Wednesday, September 16, 2009

Awesome!

Today my mod podge comic box got featured on oneprettything.com!! That is my all-time favorite website! I'm excited!!

Tuesday, September 15, 2009

Turning a $7 Giant Frame Into a Beautiful Chalkboard

I found this framed "Artwork" if you want to call it that at Good will for $7 and I saw it's potential. Something about the frame called to me saying "Amy, please take me home and give me a better life."

Photobucket

YIKES! This needed my help badly!

I cleaned it up a little first with a dry rag, took it apart, and then sprayed 2 coats of white paint on the frame.

Photobucket

Photobucket

Photobucket

When I had opened it up, there was a very stiff cardboard backing that I gave 2 coats of black chalkboard paint.

Photobucket

I was going to leave the frame pure white, but then decided to age it a bit. I first took an ordinary kitchen sponge with the soft sponge on one side and scrubby side on the other and some gold paint.

Photobucket

I put some paint on the soft side of my sponge and smooshed it together so it soaked into the sponge a little bit.

Photobucket
Photobucket

Using my sponge I wiped paint onto my frame, and then wiped it right back off again with a clean part of my sponge, that way not too much gold paint stayed on the frame.

Photobucket
Photobucket

Then I took the scrubby side of my sponge and lightly roughed the frame up a bit.

Photobucket
Photobucket
Photobucket
Photobucket

When everything dried I just put her back together again and hung her up in her new home in my kitchen, and I think she looks mighty fine if I do say so myself!

Photobucket
Photobucket
Photobucket