Thursday, March 11, 2010

Origami Paper Flowers


Spring is almost here! Keeping up with my spring inspired projects, let's make some paper flowers!

You'll need 2 different colored paper, I chose pink for my flower, and green for my stem.
Photobucket

You can get specific origami paper which is usually in perfect squares, but if you have normal rectangular paper like I do, just turn it into a perfect square like this:
Photobucket
Photobucket
Photobucket

And you end up with this:
Photobucket

Take your square and make creases from corner to corner (diagonally)
Photobucket
Photobucket

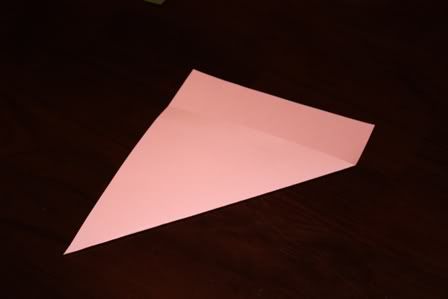
holding the creases, push in two of the sides to create a triangle
Photobucket
lay your triangle with the point of the triangle that won't openaway from you.
Photobucket

On one side take the 2 bottom points and fold up to the top point
Photobucket
Photobucket

turn over and do the same on the other side
Photobucket

now you'll have a diamond. take each left and right point on each side, and pinch together, making the same shaped diamond. This tucks away the flaps.
Photobucket
Photobucket
Photobucket
Photobucket
Photobucket

Now take each side on one side of your diamond and fold towards the center, overlapping the center just a bit, and tuck one side into the open end of the other side, then repeat on the other side of your diamond
Photobucket
Photobucket
Photobucket
Photobucket
Photobucket

Now you'll have 2 little "handles" on each side. Hold on to then with your thumb and pointer finger, (pinching where you tucked the sides together and making sure you hold tight enough they don't pop open) pull apart a bit and push the bottom down on the table, "puffing" it up
Photobucket
Photobucket
Photobucket
Photobucket

Now at the top of your flower, there should be 4 "petals" peel them back.
Photobucket
Photobucket
Photobucket

On the bottom of your flower you'll have a hole
Photobucket

Now take your paper for your stem, cut a piece length wise (about 2 inches wide) and keep folding lengthwise until you physically cannot fold anymore

Photobucket
Photobucket
Photobucket

Insert the stem into the hole on the bottom of the flower and you're done!

Photobucket

Photobucket
Photobucket
Photobucket

We're live!

We only have a few listings up, but the Little Pink Dollhouse shop is live on Etsy!

Etsy Store!

Right now we're doing hair accessories, but in the future, there will be much more!

Also, please become a fan of Little Pink Dollhouse on Facebook!

Become a Fan!

Thursday, March 4, 2010

Turning Roses into Peonies...I'm magic

Hi friends!

Here's a tutorial on how to turn silk roses into peonies, that you can do on any surface...I chose to do one on one of my old blue throw pillows. Peonies have got to be my most favorite flower in the world. They are so beautiful and delicate. There's something frilly and uber girly about them, which is probably why I love them!

What I used:

  • Blue throw pillow
  • 4 White fake roses
  • Scissors
  • Glue gun

Take your flowers

Photobucket

And pull off the backing and each layer...

Photobucket

Photobucket

Discard any plastic pieces and arrange petals in piles by size...

Photobucket

Starting with your smallest size , pinch together the tops of the petals, and the center will make a point

Photobucket

Put some hot glue on the tip of that pont, and place on the surface you are gluing your peony...for me, it's the center of my pillow. This petal will be the center of your flower.

Photobucket

Do the same for the rest of your smallest sized petals and cluster them around the center petals.

Photobucket

Once you have used all of the smallest sized, move on to the next size up and continue to cluster outside the smaller petals

Photobucket

Do the same for all the sizes, except for your largest peatals

Photobucket

Photobucket

Now for your largest petals, cut them into individual petals

Photobucket

Glue the tip, or the point of the petal, and glue them all around the outside of your cluster , but lay these flat.

Photobucket

Photobucket

Ta-da! A peony from roses!

Pillow Revamp & Fabric Rosette Tutorial

Hi Hi Hi Hi Hi!!


Sorry I have been absent for so long!


I plan on being back in action with alot of new projects for Spring!


Since spring is right around the corner, I've been wanting to bring a little bit of it inside our apartment and cheer the place up!


I've had these old throw pillows on our couches for sometime now and I've been pretty bored of them lately, so I decided to jazz them up a bit!


Here's what I used:


Photobucket


  • my old throw pillow

  • scissors

  • hot glue gun

  • fabric

  • and a puppy potty pad (which I use as a padded work space to protect my table).........don't judge.

Now, on to making the rosettes...


Lay your fabric out flat


Photobucket


About 2 inces from the edge of your fabric cut a little slit


Photobucket


Now grab hold of both sides of your cut


Photobucket


And rip it!!


Photobucket


Don't worry about trying to keep things straight, just pull equally hard on both sides and it will always rip in a straight line! (This also feels really good to do if you're P-Oed about something!)


Here's what you end up with


Photobucket


Now the lenth of your fabric strip will determine how big around your rosette ends up...the length of mine wasn't long enough for me so I just hot glued 2 strips together.


Photobucket


Once that cooled and dried I tied a knot where the 2 strips were glued, and that acts as the center of your rosette. (If you don't need to glue 2 strips together, then knot your fabric in the dead center of your strip)


Photobucket


Pinch the 2 sides of the knot together and glue them together so you end up with the knot on top and the 2 fabric "tails" side by side.


Photobucket


Start twisting your tails together and wrap them around the knot, gluing to secure as you go


Photobucket


Photobucket


Keep winding and gluing until all of your tail is secured to the rosette.


Here is what you end up with


Photobucket


Soooo cuuuuute!!


About this time in the project feel your pant leg being pulled from below the table and.......err......wait a minute! This isn't part of my tutorial....oh Harley!


Photobucket


And take your dog out to use the bathroom...this step is of course optional.


GETTING BACK TO IT!


I ended up making the bigger one with 2 strips glued together, and I made 2 smaller rosettes with only one strip of fabric.


Photobucket


Then I just glued them where I wanted them on my throw pillow and voila!

Photobucket

Beautiful! I loved it so much, I made one for my barstool!

Photobucket

LUUUUURVE